Here's a step by step guide how to apply normalmapping or other shaders to level block surfaces. If you want to use the standard shaders that come with Gamestudio, version 7.80 Commercial or above is required.
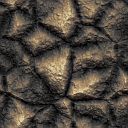
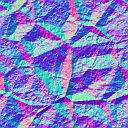
A normal map contains information about the surface angle at any pixel position, and is used for giving a surface a 'bumpy' look in combination with a bumpmapping shader. There are several external programs for creating normalmaps from textures or from model details. If a texture name ends with "_n", it's used as a normalmap for the likewise-named surface texture. So if you want to apply a bumpmapping shader to a surface texture named "stones2", you must have a normalmap that is named "stones2_n" and contained in the level's WAD or texture folder. Below you can see a typical tiled texture and its normalmap:
|
|
| rock (surface) | rock_n (normalmap) |
In the Gamestudio online store you can purchase a high resolution replacement of the standard textures, including a WAD file that contains normalmaps for all surface textures. For adding the normalmaps to the level, open the [Presets] Window, right click on [Textures], select [Add WAD] and then open the hires_nm.wad that comes with the high resolution pack. This adds all normalmaps from the WAD to the level.
Alternatively if you're using textures from an image folder, just copy a normalmap image ending with "_n" into that folder (such as "stones2_n.bmp"). !! Make sure that the normalmap exists in the folder when you compile the level, and that its texture name (including the "_n" and the extension) does not exceed the 15 characters limit for texture names in the WMB file.
Besides normalmaps, you can also add height maps and specular maps to surface textures. A height map contains height information at any pixel position, and is stored in the alpha channel (transparency channel) of a normalmap. It is used by parallax shaders for occlusion effects. A specular map contains 'shininess' information for a surface, and is stored in the alpha channel of a surface texture. It is used by specular bumpmapping shaders.
A normalmap alone is not sufficient - you'll also need to apply a material with a bumpmapping shader to the level surface on which you want the effect to appear. Materials are contained in a script. The predefined shaders that come with Gamestudio are contained in the mtlFX.c script that can be included to any level's main script. If your level has no script yet, create one: select File/Map Properties, click on the [New] icon next to the Script field, and select A7_lite_C_project. This will automatically generate a script and include the mtlFX.c shader collection.
Once you've added the script, mark the block or group you want to apply the shader to, and click the [Choose] icon next to the Material field on the Properties Panel. You'll now get a collection of materials to choose from. For normalmapping, select mtl_bump or mtl_specBump. Depending on the setting of d3d_automaterial in the script, the material is also automatically assigned to all blocks with the same texture.
The third element you need for normal mapping is one or more lights. Select File/Map Properties and make sure that you've activated Sun light. Or place a light source next to the normal mapped surface, make sure that the surface is within the range of the light and the [Dynamic] flag of the light source is checked (A7.60 or above). Or place a dynamic light in the script, with a lite-C function like this:
function light_place(x,y,z,r,g,b,range)
{
  ENTITY* light = ent_create(NULL,vector(x,y,z),NULL);
  light.red = r;
  light.green = g;
  light.blue = b;
  light.lightrange = range;
}


function main()
{
  ...
  level_load(...);
  light_place(100,100,100,0,0,255,1000);
  ...
}
Additionally to dynamic lights, block surfaces can also react on sun light. This can be adjusted through the albedo value of the assigned shader material.
Build the level (Meshes always activated!), then click the [Run] icon next to the [Build] icon on the toolbar. Use the cursor keys or mouse to navigate to the block you've applied the shader to. If the shader effect can be adjusted with entity skills, as with skill41..skill44 for the predefined shaders, set the skills globally on the level_ent entity pointer after loading the level. And if the result does not look this great at all, read on...
When blocks of your level are in the range of more dynamic lights than supported by your shader, light sorting can cause artifacts. This happens when the light manager assigns different sets of lights to adjacent blocks, due to the different distances of the block centers to the light sources. The result can be sharp brightness differences along block boundaries, as you can see below in the screenshot, close to the right wall:
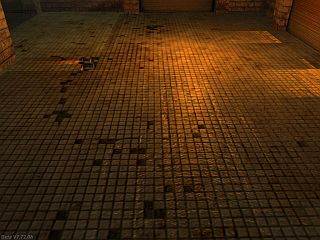
Similar light artifacts can be caused by using a per-vertex lighting shader (such as the standard bumpmapping shaders) and having adjacent block meshes with non-matching vertices. The 3D hardware interpolates the lighting between vertices, which can cause visible seams when the vertices along touching mesh edges are at different positions.
There are three possible ways to prevent such light artifacts:
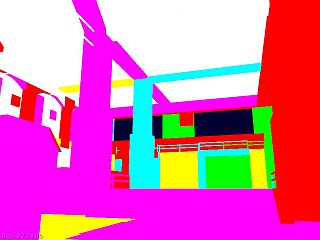
The last method is the best because it also improves the frame rate and the look of the level. Use the mtl_lightcount shader for adjusting light ranges. The shader displays the number of lights in range of the view frustum and a block mesh in color code: black = 0, grey = 1, blue = 2, green = 3, cyan = 4, red = 5, magenta = 6, yellow = 7, white = 8 or more. Adjust dynamic lights until no area of the level has a higher color code than blue or green. Below you'll see the image of the level above with way too many dynamic lights:
For temporarily replacing any of the predefined shaders by the light count shader, copy mtlFX.c in your work folder, edit the material definition and temporarily replace the original effect = "....fx"; line by effect = "lightcount.fx";.